Trip options explained
The Manage trip dialog has most of the options for your trip:
Basic settings
- Location or starting place. This is the “home” for the map; you can set this to an arbitrary place.
- Trip timezone (optional). When you sync the trip to you calendar, this is the timezone that will be set on the calendar. If you don’t set this, the calendar will have your default timezone.
Budget settings (optional)
- Total number of travelers. This is used for budget calculations. By default, the calculation uses the number of collaborators on the trip. However, you may want to manually set a value. For example, when you have children traveling and you want the budget calculations to match the actual number of travelers.
- Subtract day count. This is used for budget calculations. Your trip may have travel days built in on the ends that you don’t want to count in your budget calculations. You can subtract these days from the total number of days.
Workspace settings (optional)
- My start date is set! When this is toggled on, the calendar icon at the top is hidden. Set this when your trip start date is confirmed.
- Show the calendar tab. The calendar tab is hidden by default, but you can choose to show it if you want to visualize your itinerary on a calendar.
- Show media inline with days. By default, media are not shown on the planning or timeline view. But you can choose to turn this on so you can see your media (6 per day) inline with the view.
- Show time of day icon. By default, the time of day icon is hidden in the planning and timeline view. If you have a lot of activities planned without precise/exact times, this can be useful to have an indicator of whether it’s a morning, noon, afternoon, or evening activity.
- Hide the additional tags for each place. By default, place tags are hidden. These tags can show additional information inline with the place like the confirmation code, budget, time of day, and the media. (Hint: you can tap on the confirmation code to copy it to your clipboard; very useful when texting!).
- Hide notes for each place. By default, places with notes will have the notes displayed in the planning and timeline view. You can turn this off.
- Hide notes for each day. By default, each day can have notes associated with it. This is useful if you need to keep generalized notes for the day. You can turn this off if you aren’t using it
Customizations
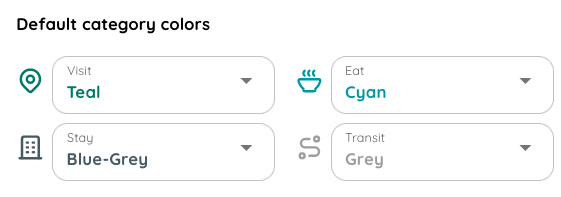
If you’re extra OCD (like some people we know…), you can set the default colors for each category of place to have a consistent look and feel: